Illustration How to: Strip and Crimp a wire
Now is a good time to illustrate, if your unfamiliar with wire stripping or crimping. We have included 2 small videos of us demonstrating how to use the w... View MoreIllustration How to: Strip and Crimp a wire
Now is a good time to illustrate, if your unfamiliar with wire stripping or crimping. We have included 2 small videos of us demonstrating how to use the wire stripper, crimper for connections and the second video how to use lever type wire connecter.
Prior to this post we had recommended a few tools which we will repost here again for this segment along with wire connecters as well.
Lever wire connecter https://amzn.to/3yExufl
All in one wire striper/crimper https://amzn.to/3a6NlJz
If cost is an issue then the above is advised otherwise if a child will be doing this or cost is not much of an issue the below 2 recommendations will be highly advised
Wire Stripper/Cutter https://amzn.to/39RiUXq
Wire Connecter Crimper https://amzn.to/3lemgX6
Heat Gun https://amzn.to/3wijQx2
Wire Connecter Kit https://amzn.to/3Mpa020
https://amzn.to/3wqJsqh
10 awg wire https://amzn.to/3sBTtzJ need very little mostly using 12 awg
12 awg wire https://amzn.to/3FLeH3m
The below procedures will be followed by a mini video to illustrate how to do it.
Wire Stripping, the wire itself should display what gauge wire it is. Once you know, take your choice wire stripper and measure out 1/2 wire placing it into the slot the wire stripper states its gauge is meant for. If your using option 1 above the all in 1 tool you will need to clamp it down unto the wire and in a circular formation move the crimper from side to side holding the wire stationary as your making this movement. This will cut the wire insulation. Then, when the cut is complete, hold one end that is behind the one your cutting from and hold tight as you are pulling the wire insulation will be removed. If your using option 2 all you need to do is measure the amount of wire you wish to remove the insulation from and then make sure it is in the correct wire gauge slot and clamp down, it will make the necessary cut and remove the insulation.
Next, take the bundle of lose wire from the bottom connecting to the insulating remaining wire and give a few tugs while gripping the lose wire with your fingers making sure there are no lose wire hanging downward toward and past the insulating part of the wire. Then with your forefinger and thumb grip the lose wire and give it several twists in one direction to tighten the lose wire into a small pointy bundle.
Next, take an appropriate connecter being it a ring connecter M4 and M5 then place the pointy bundle of wire into the connecter end. The end is the one with the opening that looks like a sleeve which is for heat shrinking purposes and make sure it goes into the metal tube cleanly. Take your crimper and place it around the metal tube inside the sleeve. If your using the all in one tool be prepared to possible have to use both hands to give enough pressure to crimp the wire. If your using option 2 you will see in the video it is quite easy to crimp. I like to give a secondary crimp a little lower to be assured of a successful crimp.
Next, we will take the heat gun and point it to the end where the sleeve is and the insulating wire and heat the sleeve so it tightly bonds with the insulation.
Here is a Mini video to watch which will or should make it easier
https://rumble.com/v1h7b66-how-to-strip-a-wire-and-crimp-on-a-connector.html
Next, to illustrate how to use the lever connecter here is a mini video with the boys demonstrating how to perform
https://rumble.com/v1h7b3o-how-to-use-the-lever-type-wire-connecter.html
If you find the mini videos helpful please give a like and subscribe to the channel for more videos under mini solar generator project.
If you think this was helpful please give a like on the post -- Much appreciated.
Remember practice makes for perfection and it becomes easy peazy...
If you can help, we would truly appreciate and need it -- Thank you https://gofund.me/5b4a16c6 Any little bit helps and we truly are grateful.
Glutoad 40PCS Lever Wire Nut Connectors. Compact Splicing Wire Connector, 2 3 5 Port Electrical Connectors Assortment Kit for Quick Wiring 28-12 AWG: Amazon.com: Tools & Home Improvement
Glutoad 40PCS Lever Wire Nut Connectors. Compact Splicing Wire Connector, 2 3 5 Port Electrical Connectors Assortment Kit for Quick Wiring 28-12 AWG: Amazon.com: Tools & Home Improvement
Installing the battery and securing
Here we will be installing the battery and securing it along with the ac battery charger.
Now, lets review we asked that you cut a piece of Styrofoam or foam or b... View MoreInstalling the battery and securing
Here we will be installing the battery and securing it along with the ac battery charger.
Now, lets review we asked that you cut a piece of Styrofoam or foam or board even plastic for the bottom of the crate. Here, we simply used a piece of foam. Lay it flat on the bottom to give us a nice flat clean surface to work with.
Next, lets take the ac battery charger that you purchased or the one I suggested and take the end that has the ac plug cord to the back and snake it through one of the bottom holes. Push it tightly to the side and take the battery connectors and drape it over the side, we will be using them to connect to the fuse box.
Suggested AC Battery Charger https://amzn.to/3wbbo2q
Now is the time to realize why we took the battery earlier when preparing the case and drilled 2 3/16 holes on each side on the bottom and if you purchased a different type of milk crate like the one at Walmart, it seems flimsy to me but should work, they have solid and holes so you may have needed to drill the top 2 holes as well. Two things to mention here. 1) Please be sure the two battery posts are on the inside of the crate and the back of the battery is on the rear wall of the crate. 2) Have the battery real close but not touching the AC Charge controller, thus the reason of setting it in place. This is because, if needed to charge another battery you could pull the fuse and disconnect the battery charger from the fuse block and use it elsewhere to charge another battery.
Suggested Battery and use code: guardianwill to save https://batteryevo.com/battery-evo-12v-28ah-lifepo4-battery-ef1230-360wh-solar-rv-golf-cart/
Now that the battery is situated correctly, its time to secure it to the case.
We will use 3 12" zip ties on the bottom and 3 on top. How I did it, which makes it quite easy is I fed one into the bottom whole about 1/2 from the bottom from the outside with the zipper part of the tie on the outside of the rim, then I fed the second side on the bottom from the inside of the case. The third one will be used because it just doesn't reach far enough around. Connect the two inside the case with a few clicks and then connect the third tie together with the two ends. Pull tight and secure it in place. We will repeat the same with the top half. Below, you can see a picture of the fuse box and we will be securing it between the 2 straps securing the battery onto the front side of the battery with double sided tape. Pull tight. As you can see the battery is now very secure and will not be going anywhere if tossed around.
Now that we have the ac battery charger placed and the battery secure. We will be installing the master switch and the fuse box and the volt meter to the battery. Lets have some fun!
If you can help, we would truly appreciate and need it -- Thank you https://gofund.me/5b4a16c6 Any little bit helps and we truly are grateful.
Preparing the Container
Making Modifications to the milk crate.
If you ordered in the light I suggested and the switch for an additional light without a on/off switch along with a few other holes th... View MorePreparing the Container
Making Modifications to the milk crate.
If you ordered in the light I suggested and the switch for an additional light without a on/off switch along with a few other holes that will need to be drilled these preparations are necessary.
As you can see, the led light is quite large and needs to be fitted into the milk crate. I set it on the bottom giving a nice glow as well as lighting the pathway floor.
Led light https://amzn.to/3LhXzDr
First, lets look at all sides and decide which side will be the front and the rear of the box.
Milk crate https://amzn.to/3LatCoX
The led light and place it on the lower end of the milk crate, on the side that you will want to be the front. Center the led as best as you can and you will see it over laps some of the tabs but most of this area is flat as well which is handy.
Thae your razor blade knife (box knife) being careful, make a small notch around the led light fixture. The top should have 4 notches and the bottom should have 4 notches. When we have the notches made we will then carefully tilt the led up to its side and mark the center where the wires are so later we can drill a hole at this center mark.
Now, you can take and move the led light aside and where you cut the notches into the tab I want you to make a clean cut through the tab bottoming out to the flat bottom. Then, take at a small angle from inside the cut a few fractions of an inch and then cut diagonally to meet with the bottom. You should have a triangular shape piece easily removed. Do this for the other seven remaining notches.
Now that we have all notches cut we have to remove the center part -- between the two cuts we made to let the led lamp fit in. The easiest way I found was to simply take a pair of pliers and from one end bending the tab back and forth through the entire cutout and it will simply break off. Do this for all 4 areas and use the box knife to clean up any remnants that will not let the led light sit flat.
Remember in the center we made a mark for the hole to fit the wires through. Take a 3/16 drill bit and drill a hole where you had made the mark. Keep the drill and 3/16 handy we will use it again.
Now, we should be finished with the bottom led light, place the wires through the center hole and fit the led light into the areas you cut, it should fit nice and snug. If not, use the knife to make any small adjustments. Now that is sitting flush take some of the two sided tape and adhere the led light to the crate.
double sided tape https://amzn.to/3waEuPf
You may find it is not as secure as you want it, so in two different places drill holes on top and bottom on the two sides of the led light then take the small zip ties. feed it through one end of the hole, around the led light and back through the crate then connect and zip it up to tighten.
Zip Ties https://amzn.to/3Le3jhN
The next item we will concentrate on is the on/off master power switch. This shuts down all power and also places one rule into usage of the gen. Always turn it on even if charging first especially before connecting to the solar panel. The nice thing is its easy to store with the master switch off, the only draw from the battery is the volt meter.
On/OFF switch https://amzn.to/3yBT0Bw
for this adjustment to the crate we will need a simple 12mm hole saw and drill and a box knife. We may want to take our inverter since it is planned to go into the adjacent side up flush and mark how far it comes from the side wall inward. Now, from inside the case drill the 12mm hole all the way through. On the front side you will see there are remnants of the tabs that we will need to trim out so the bolt can tighten and move easily. once the debris is removed slide the switch from the inside part of the case toward the outside. Use the washer and nut and tighten. The switch should be secure and stationary -- it will get plenty of use.
Next, on the opposite side if you had a usb light bar and want to add it to the top we will need a switch and holes to use zip ties to attach.
On/off switch https://amzn.to/3syDy5l
USB Light Bar https://amzn.to/3LcpbtK
19mm 3/4 inch hole saw https://amzn.to/3yxGMK4
This usb light has 2 choices of setting one up. The first way is quite convenient, you could take the light bar, situate it up top and drill four holes to connect the light bar to the crate and then snake the usb connection inside the case. Later on, if you ordered or are using the solar charger I recommended plus many others it has a usb connection. We will connect it then.
Second way allows a wee bit more freedom in case you want to change it to a different light bar later on we will have the switch already built in and the wiring is quite simple.
Here we will take a 3/4 inch hole saw and drill a hole like the other from the inside going out. You will need to take your box knife and trim for the out ridge of the switch itself to fit flush with the flat surface and then simply push the switch into the hole. It will take a little effort but will go in and be sturdy. Next, lets take the led light and place it where you wont on top by the switch. Mark 4 holes towards the ends of the light one above and one exactly below. To the left before the switch and next to the end we will want a hole to snake the wire from the led light through the case. Now, lets do some damage to the led light. Allowing some cable we will take and snip the cable so the switch and usb connector are removed. Then snake the wire through the hole and then take 2 zip ties snaking them from behind and around the led light bar and then through the corresponding hole be it from top or bottom starting and then zip it until it is snug.
We are almost finished with our preparation. 2 small other changes and then one last thought and then we are ready to put the battery in.
Take your solar controller and place it up on the inside top front corner or wherever you want to place it.
Renogy Wanderer Solar Charger https://amzn.to/3weqUL3
As you can see there are 4 holes in the wanderer base to connect it with. We will only use two. With the wire connections facing toward the back of the crate the two holes we will be using will be the upper left and lower right. Take your 3/16 drill bit and run it through those two holes to widen it a bit. Next, place the charger up where it will be installed, with the wire connection facing to the back and mark the upper left hole to the crate. Drill a hole. Thats all we need to do for now with the controller and you can set it aside.
Here we will want to take the Styrofoam I told you about, measure indie dimension and cut the foam to size.
Place it on the bottom so it lays flat. The reason I chose Styrofoam is because it is almost weightless and won't add much to the weight plus it is easy to cut as well as some waterproofness to it as well. You could use plastic or plywood, its your choice. It is just nice to have a flat surface and nothing getting into the generator from the bottom.
Once it is placed flat on the bottom, we will then take your battery and place it to the back of the crate. Its up to you where you want to place your battery, however, for even weight distribution and easy carrying I just centered the battery in the middle of the back wall of the crate.
BatteryEvo 12v28ah code guardianwill https://batteryevo.com/battery-evo-12v-28ah-lifepo4-battery-ef1230-360wh-solar-rv-golf-cart/
When you have it placed take a yellow marker or simply mark where we will drill 4 holes to connect the battery to the crate so movement is restricted. About 1/2 inch from the bottom on both sides of the battery and 1/2 inch from the top and again on both sides of the battery. Later, We will be connecting it
If you can help, we would truly appreciate and need it -- Thank you https://gofund.me/5b4a16c6 Any little bit helps and we truly are grateful.
Well we are done with the modifications to the case and are now ready to put it all together.
Well we are ready to get started. The whole project should take less than 3 hours of your time and you will definitely want to and will have fun. What I believe will be best is to break up these pos... View MoreWell we are ready to get started. The whole project should take less than 3 hours of your time and you will definitely want to and will have fun. What I believe will be best is to break up these posts into smaller segments and each post will have a title so it can easily be searched. Have Fun!
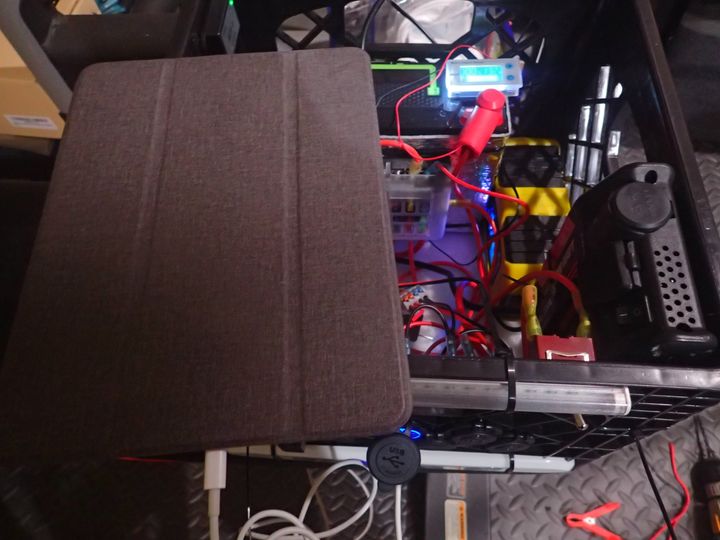
Testing the finished set up process easily charging my ipad.
While we are all getting our needed parts ordered and delivered, this post will explain why we chose our battery and from whom.
While searching for a 50 ah battery, I noticed how expensive this littl... View MoreWhile we are all getting our needed parts ordered and delivered, this post will explain why we chose our battery and from whom.
While searching for a 50 ah battery, I noticed how expensive this little learning project could go so we decided to look for a 20 ah battery. Yet, they too were quite a bit on the pricy side. If we did find one reasonable, a simple youtube search produced tear downs on many of these batteries and either they failed in what they promised to produce or you simply could not get a hold of anyone in the case you needed technical support. Many of the batteries sold on Amazon ship by the seller and not by Amazon so refunds and tech issues are left to the seller. Many times a simple request on info I never received a response. The tear down videos also showed they did not produce adequate results or simple were put together horrendously but usually noone would be tearing them apart under normal circumstances so their short comings may not be found out until way too late. Remember also the cost of sending a battery back to the seller -- especially if not us bound could and is very costly.
After a lot of research and calling the company Battery Evo they actually answered their phone, responded to my emails in a timely fashion -- usually within 24 hours and are based right here in CA.
The next was they had a good price on a 28 ah lifepo4 battery that would make this kit under 300 could be way less. I purchased through Paypal in case there was any issues that could not be unresolved -- thank goodness there were none.
They actually shipped the product out the very next day USPS priority mail. It was quick with only a small delay from USPS and Los Angelos slowing things down for handling purposes.
The battery arrived within 4 days and was packaged well enough.
Took the battery out of packaging and inspected. Afterward we took a voltage reading which was expected low for shipping purposes so we took and charged it fully using the charger purchased for this project and then we went ahead and did a capacity test, a test that shows how many watt hours the battery can produce from full to empty. This particular batter should be 12 v x 28 ah = 336 watt hours.
The test ran for several hours and the test was complete. Now the outcome was better than expected with 342 watt hours produced.
So, with a US based company, has actual technical support and responds, quick ship time and does what they say it will this is a no brainer especially with reasonable pricing it has my recommendation.
If your interested in following this project like we built, you can save on this battery 7% or anything from their store using the code: guardianwill with free shipping and 7% means at least the price will reduce by what our state sales tax is and then some.
BatteryEvo 28ah lifepo4 battery: https://batteryevo.com/battery-evo-12v-28ah-lifepo4-battery-ef1230-360wh-solar-rv-golf-cart/?sku=Battery%20Evo%20EF1230&msclkid=7e413580ab641756d9a5568c48cbdf12&utm_source=bing&utm_medium=cpc&utm_campaign=**LP%20-%20Shop%20-%2012V%20Batteries&utm_term=4587162516813827&utm_content=84%20%7C%2012V%2028Ah%20360Wh%20LiFePO4%20%7C%20%24125
remember to use guardianwill as coupon code to save 7%
If you can help, we would truly appreciate and need it -- Thank you https://gofund.me/5b4a16c6 Any little bit helps and we truly are grateful.
Now, we have a battery able to be charged 2 different ways, a container to hold it all in were closing in to the build. We now will discuss how we can power up or charge our things using this stored ... View MoreNow, we have a battery able to be charged 2 different ways, a container to hold it all in were closing in to the build. We now will discuss how we can power up or charge our things using this stored power. After this we will look at what consumables we will use for this project and what tools to have on hand. We know the battery is rated for 12 volts x 28 ah - 336 watt hours. In simple and very basic terms this says you can run 1 watt for 1 hour or 336 watts for 1 hour.
Our usual needs should be for this small generator to charge our laptops, run anything under 200 or 300 watts using electricity. We will have a 12 volt car socket a usb C and a USB quick charge connection with some bright lights.
My inverter here is one I had in my SUV for what seems forever so I will use it here but its so old they dont even sell it. The first milk crate project I built I used a 300 watt pure sine wave inverter. There are 2 kinds, maybe more, but we will discuss 2 kinds readily available. There is the modified sine wave which can prove not to be useful since some electronics do not like this manufactured digital sine wave but is very reasonable. The second, a bit more expensive has a pure sine wave safe for most electronics. The battery can give a total of 336 watts for one hour. So, if I may suggest to go just a wee bit lower than what the max watts are and look for a 300 or 200. Do they same calculation with a bigger or smaller battery. Also, the battery itself here what we will be using for this project can only offer 20 amp continuous so 300 watts / 12 volts = 25 amps. Though I have yet to see a laptop take a full 300 watts, maybe 60 or so watts so it is safe and the 200 watt inverters I have not seen anymore worthy of use.
The 300 watt inverter I used in the first project is: https://amzn.to/3M38Dpk
pretty reasonable for a pure sine wave.
Then we will have a fuse box to connect everything to from the battery. This will have both a positive with fuse bus bar and a ground bus bar for 6 connections. This is to isolate the components and to protect the wiring and other components in case of a short.
The fuse box we will use here is: https://amzn.to/3ywBQVY
This fuse block uses the standard blade fuse like your car uses. You may have a kit already, if not here you can get a small kit: https://amzn.to/3weIuwY and don't worry, you can use them in your vehicle too.
The most common use of connections are USB. So something that has USB C and Fast Charging 3.0 USB would be awesome to have a choice. We will have 2 sets of these incase more than one person wants to charge their phome or tablet or headphones or anything that uses usb cable to charge.
USB Kit: https://amzn.to/3MncNJ3
What is nice is this kit also includes a car socket (Cigarette Lighter) connection. If you have a laptop or a CPAP machine, most likely it comes with a AC plug in, great for the inverter but loss of energy. The AC plug in for your laptop or machine usually will take the AC current and turn it into DC current. This conversion will have an energy loss. So, if you can find a car charger for your laptop then you can hook it up with the car connection and use a straight DC power and not have the conversion loss. This is the lit I found that will work nicely with the milk crate and easy to use. What we will do is splice the 2 sets together using a 20 amp fuse, theoretically if you have 2 items plugged into the car sockets each can use 10 amps a piece.
The usb/car socket on/off kit: https://amzn.to/3MncNJ3
Something as simple as a volt meter is quite handy to use to know how much battery you have left with a quick glance. The one I chose to use might not be the cheapest but it seems to be widely used and dependable with a temp gauge on it as well. Knowing the temp in cold weather is quite important using a lifepo4 battery. No charging if 32 degrees or below. You can do unrepairable harm and damage to the battery cells.
Volt/Temp Meter: https://amzn.to/3M9q4Vo
Not only is it dependable but very easy to set up and use.
Last thing, we will use for this project are led lights. This project we will have a top and bottom lights powered separately.
Light One: https://amzn.to/3kYAfQG
Light two: https://amzn.to/3MaXH96
We will actually take and splice both lights into a 10 amp fuse. The second light we will use a different on/off switch and have it spliced directly wired with the other light instead of using the USB connector.
Well that does it, you can add more or less to the project as you want, that's what is one benefit of creating our own besides for learning.
The next subject are consumables. Things you will need to put the project together.
Since the highest wattage that will travel through our cables is 20 amps the gauge of wire we will use throughout our project is 12awg or 10awg.
10 Gauge: https://amzn.to/3M6sFzq
12 Gauge: https://amzn.to/3kYFwI1
We will be learning what connectors we need and how to crimp the connectors to the wire to make a solid connection as well as using a heat gun or a lighter to shrink the heat wrap to make a nice connection.
Wire Connector Kit: https://amzn.to/3N4DQZm
Varies Wire Connectors/splitters https://amzn.to/3L9XIcd
On/Off switches. One for the top light as well as a master on/off switch to turn everything on or off.
Master on/off switch: https://amzn.to/3w2ttj9
LED Light on/off switch: https://amzn.to/3l4Y6Os
For safety reasons, we will want a pair of battery post booties to protect the main battery connectors.
Post protectors: https://amzn.to/3L4Igy8
To have a easy and safe way to connect your solar panel we will be installing a quick connect that can easily handle the amperage and voltage of your solar panel.
Connector: https://amzn.to/3ssWYs6
Then from the milk crate to the solar panel this will be the cable to get in most instances.
https://amzn.to/3ssWYs6
Double sided tape to adhere some of the components.
Double Sided Tape: https://amzn.to/3l25c6t
Zip Ties: https://amzn.to/3FzUldv
Asst Nuts and Bolts
Some Styrofoam as well.
Finally, we need some tools to help us put this all together. Many of these tools you may find you already have laying around your house, some -- maybe not so for those I will give a suggestion links for your comparison and consideration.
Screw Driver, both standard and Phillips
Adjustable wrench
Battery or Electric Drill
Wire Cutter
Wire cutter/stripper/Crimper https://amzn.to/37CpHnf
Better crimper: https://amzn.to/37CRJPn
Better wire stripper/cutter https://amzn.to/3l50RiM
Voltage Meter: https://amzn.to/3yqwMSS
Mini Heat Gun for shrink wrap connections https://amzn.to/3l8IZ6B
Asst Drill Bits/hole drill bits
If you can help, we would truly appreciate and need it -- Thank you https://gofund.me/5b4a16c6 Any little bit helps and we truly are grateful.
Now, this leads us to the Build. See ya soon. Hope you have everything ready.
The last thing we should consider is as we all well know, the weather is never truly perfect. We can have cloudy days and/or snowy wet or rainy weather. Solar harvesting is not at its optimum when w... View MoreThe last thing we should consider is as we all well know, the weather is never truly perfect. We can have cloudy days and/or snowy wet or rainy weather. Solar harvesting is not at its optimum when weather isn't perfect. So, how do we charge our solar generator without a nice sunny day?
With this in mind, we need to have an alternative. This AC shore power is an important alternative. Especially if we have a gas generator. Simply plug it in while we are powering other needs and the charging will begin. Other considerations, such as your camping and have power so you could be charging in the evening, while sleeping, and ready for a new adventure with portable power when you awaken.
We have many battery chargers available, and you may even have one with you at home. Some considerations when purchasing one, which we will then install into our project here is the chemistry of your battery and the total amperage that you can charge with. Another consideration is to have a multi chemistry battery charger so you can use it in case of an emergency to say charge your car battery.
The first project we already built was a 5 amp lifepo4 battery charger. We have several of these batteries around thus it seemed nice it was detachable quickly and could be used outside of the project.
We looked for a reputable charger that was also cost efficient since our hopes are that we won't have to use it unless of bad weather.
ExpertPoewer 5 amp lifepo4 https://amzn.to/3PjkstI
For this project that we are going to build, we found a multi chemistry 10 amp battery charger on sale and though it is a bit larger will still work. And, if need be, we could detach and use it for any type battery chemistry and easy to use.
10 amp smart charger. https://amzn.to/3whSAx5
The next post we will be discussing the necessities that we need to use this harnessed power and finally the tools that we will be needing with other useful items. Then to put it all together.
I hope we have learned thus far a little about batteries, solar and charging. Next, to use this energy and then finally reap our reward and building one within a few hours. For now, think what and how you want to use this generator for. It will come to be handy in the next post.
If you can help, we would truly appreciate and need it -- Thank you https://gofund.me/5b4a16c6 Any little bit helps and we truly are grateful.
Now we have a container and a battery, since this is a solar generator we will need to discuss how to charge the battery to store the energy when we need it. After paying for itself with free energy,... View MoreNow we have a container and a battery, since this is a solar generator we will need to discuss how to charge the battery to store the energy when we need it. After paying for itself with free energy, it will be one of the wisest investments we can make. Thus, the next in line of this series is what we need and how to charge the battery using the Sun.
Since we have the battery already, we can find the necessary information we need to be able to purchase the perfect solar controller in which we will connect to the battery and then to the solar panel. The battery will tell us 2 important details. Such as type of battery we purchased being an agm or lifepo4 or even a lead acid battery. Most solar controllers these days are multi chemistry chargers meaning they can charge most types of batteries in the proper sequence to charge them. Second, how much current (amps) can the battery safely use to charge with. If you are using the batteryevo I used then the answer is on the battery with 20 amps. So, we don't need to buy anything bigger than a 20 amp controller that can charge a lifepo4 battery. I started with a 10 amp pw charge controller but moved up as we will discuss later.
The next thought to go into it is the environment you live in. Is it usually sunny or do you have more cloudy hazy days? If you have mostly clear sunny days then your in luck and a PWM (Pulse Width Modulation) controller is an (electronic) transition between the solar panels and the batteries which is very cost effective, small and readily available. It must have a good shot at the sun and the charging current can be affected by a passing cloud and isn't very efficient in shady areas which affects the output of its charging capability. Luckily, for those of us not living under pristine skies there is the MPPT, or maximum power point tracker is an electronic DC to DC converter that optimizes the match between the solar array (PV panels), and the battery bank or utility grid. This is 3 times the cost but 10%-30% more efficient in taking and converting the Sun light into usable charging energy.
*** A few tips to remember as we discuss hooking this up to the battery and solar panels.
Always hook the controller to the battery first. Remembering to place positive with positive and negative to negative connections. Use the proper wire gauge to wire both the solar panel and the battery to the controller.
Some Examples:
10 amp PWM Controller: https://amzn.to/3vwDYL7
30 amp PWM Controller: https://amzn.to/3vyh32a
20 amp MPPT Controller: https://amzn.to/39nSSe5
40 amp MPPT Controller: https://amzn.to/3F30jTW
Now that we have the controller figured out we need to be able to absorb the sunlight from the Sun so the controller can turn that absorbed sunshine to free energy. These are called Solar Panels. With the information from the controller we will be able to see what size solar panel and how many we can connect up either in Parallel or Serial. For our mini project we will not need to emphasize these for the reason we will only need one about a 50 - 100 watt solar panel. They usually come in 2 different types that we will discuss briefly here. There are solid or folding panels available. If your charging is going to be more stationary the cost effective solution is to purchase a solid panel or if you need it to be extremely portable and easy to carry the more costly foldable suitcase type panels will be your solution. The Solid Panels are usually cheaper but bulkier and heavier and will last longer too. The portable usually fold and then zip up to form a suitcase with handles and are lighter to carry.
Remember, the more wattage the panel can deliver usually means the bigger they are but the faster you can charge your battery.
Some Examples:
200 Watt Solid Solar Panel: https://amzn.to/373LCmT
100 Watt Solid Solar Panel: https://amzn.to/3kw36eS
50 Watt Solid Solar Panel: https://amzn.to/3MD72Gw
10 Watt Solid Solar Panel: https://amzn.to/3vwqf75
60 watt foldable Solar Panel: https://amzn.to/3kwj8Fr
60 Watt Foldable Solar Panel: https://amzn.to/3kwjk7D
As you can see, when previewing the size and type and cost are different.
In our original mini Solar Generator we started out with a 15 amp PWM solar controller and a 50 watt solar panel. Later we switched because of Idaho, its haziness even when Sunny and cloudy or overcast too so we went with a 20 amp MPPT and a 100 watt solar panel.
The connections on most of these are what is called an MC4 Connector. Water tight and a solid connection. Though the panels can come with different types of connectors so you will need to be aware of what type of connector they come with.
We will be discussing later how to put it together but for quick thought you will connect two wires from the controller to the battery first and then connect the other 2 wires with the proper connections to the solar panel. Follow instructions contained with the controller to set it up for your battery type. Put into the Sun, pointing to it and angled. If you search for your area one could find the proper angle to the Sun that is best.
If you can help, we would truly appreciate and need it -- Thank you https://gofund.me/5b4a16c6 Any little bit helps and we truly are grateful.
Have Fun... Next we will finish the charging decision for land Power (AC) charging if you have power and need to charge it quickly.
Now on to our choice of battery and at the end I will as well give several suggestions to look at for big or small just reference the companies emphasized.
Realizing, this is for my 2 boys and our ... View MoreNow on to our choice of battery and at the end I will as well give several suggestions to look at for big or small just reference the companies emphasized.
Realizing, this is for my 2 boys and our science project we decided some batteries might be too heavy to control. Some may spill if dropped or some may even catch on fire if left out in the blaring Idaho sun. Cost was a major factor also, remember this is one of the 2 items of the most expensive on the list.
The safest and best bet was going to be the lifepo4. was light weight, can handle a charge for long periods of time and can discharge to give power when needed for a longer time frame as well. It is also safer in the heat than straight up lithium batteries and the only downside is the 32 degree rule but usually if it is that cold it will only be used inside where it is always above 32.
Next is the size factor. If you plan on using a milk crate then you can safely use a 50ah battery and still have ample room for the other components. If using a ammo can, you can probably fit in a 28ah or 20 ah battery size.
Now we know what size and how much we want to spend as well how much amperage we will need. The dc items are all trivial but we did have a inverter 200 watt to use thus it had to be more watts then this needs. Now it is time to search, and everything was quite expensive. After reviewing 100's literally YouTube videos of different companies and battery tear downs like from DIY Solar Power with Will Prose, LithiumSolar and DC Guy to name a few helped you not feel so overwhelmed on the number of companies building batteries. We Actually Found a company that was affordable and sold the battery size we were looking for Battery Evo was its name and they had a 28ah lifepo4 battery, perfect size for 99.00. This was fabulous. 28ah x 12 volts gave us 336 watt hours well enough to run everything we had wanted for our other components and run the 200 watt inverter as well. I called them and they quickly answered the phone and quite nice to answer my questions. We purchased it and was on our way to creating the solar generator.
If you wish to follow our battery choice, especially when you see, we choose to have 2 of these and gave us 56 ah and still less than a 50ah battery. Here is the link: https://batteryevo.com/?msclkid=7a802bd38dc31a23e5ed49b0cb8ea187&utm_source=bing&utm_medium=cpc&utm_campaign=**LP%20-%20TM%20-%20General&utm_term=Battery%20Evo&utm_content=Battery%20Evo and if you decide to order anything, they have been kind enough to offer a discount to you at 7%. If you enter Guardianwill at the checkout where it says coupon code the 7% discount will be added.
Anyway, we decided to raise the inverter to 300 watts and the single battery would have lasted but we wanted to double to 56 ah and be able to run the boys 2 laptops even if the power was out all day or we were gone for the whole day and yet could easily be recharged with our gas generator or through the Sun or even gris power if it were on.
Its hard to find reputable companies selling batteries they promise a lot and yet they do not work out to be as great as they say. Build quality is one item as well. Yes, we are on a budget but something you don't want to skimp on to save a dollar now. BatteryEvo is located here in CA. They also work closely with Battery One a company that was built here as well. We will be using them again on our second project where we will be building the battery from the cells and Battery Management System.
Another company is Renogy which was started here I believe in Philidelphia. My only complaints with them is it takes a long time to have something delivered from them and they are not known for great customer service. It could take days to weeks to get a response from them as like their delivery. I had ordered a few items for controllers that was shipped by them and it took 2 -3 weeks to have something get to me after following up on the order. Now, the shipment part is over rided by ordering through Amazon if Amazon is shipping.
50 Ah lifepo4 battery Renogy: https://amzn.to/3EHlSt1
Other well built batteries are from:
Chins: https://amzn.to/3MkYsfq
Zooms: https://amzn.to/3LbWnT6
Dakota 54ah: https://amzn.to/3vEtAjt
Battleborn: https://amzn.to/3MmtELu
As you can see, at first when searching we about fainted from the prices. There are other companies but many of them after watching the guys on youtube tear them apart and noticing many flaws in craftmanship or design to cut corners or just not thought through. Yes, you can order from the companies and sometimes they have nice deals but most of the time not. And yes, you can order from ebay or alibaba but if you have a problem you are most of the time responsible to ship back and shipping lithium products is quite costly especially if they are overseas.
Now that we have our crate and source of energy storage we now need to charge it up.
I still suggest batteryevo for cost effectiveness and good customer service. Don't forget to use Guardianwill when you check out to save 7% -- Thank you and Thank you Battery Evo!
If you can help, we would truly appreciate and need it -- Thank you https://gofund.me/5b4a16c6 Any little bit helps and we truly are grateful.
these posts may contain affiliate links, and yes, we will earn a small commission but no cost to you. This helps us to purchase further things for testing so you don't have to.
Battery
Now that we have chosen what we will build the generator in, we need another important component -- a battery to store the energy and to be able to use this energy. Most of the time we think... View MoreBattery
Now that we have chosen what we will build the generator in, we need another important component -- a battery to store the energy and to be able to use this energy. Most of the time we think of batteries, portable components that store energy ready to be used on demand. A few thoughts have to go into this to purchase the best available storage device (battery) for our project. Here we will discuss the chemistry of several different batteries, their positive and negative aspects of each chemistry. Then, how large of a battery can we actually and comfortably fir into our device's container and lastly -- budget. How to get the best bang for our buck!
A battery uses certain anodes cathodes and stores this energy using a different chemistry.
Here we are going to lightly touch on some of the more important subjects. There is however a free course, unaffiliated to me, that will definitely teach you way more than what we are going to cover here. https://alison.com/course/battery-technologies?utm_source=bing&utm_medium=cpc&utm_campaign=424620871&utm_content=1348002735336832&utm_term=kwd-84251063629114:loc-190&msclkid=18921f637f83109f8f127d01a6db51b5 If you take the course, I hope you will enjoy.
Below, in our first photo it displays how the battery charges, stores and then gives back its energy to you.
Next, we know of our car batteries being lead acid which we are all very familiar with. They only last 2 to 3 years and gives the car power when it is not running and the car in return, when running, will automatically keep the battery charged. When and if the battery goes out, it stops starting the car and usually needs to be replaced. Sometimes however, we may just need to recharge using an external charger.
We have lead acid, gel batteries, meant for heavy loads, such as starting cars, boat motors ect. The positives are they are less expensive and can issue, on demand a strong current to start a motor. The downside is they are heavy. They have to have lots of fresh air because of chemical expansion and contraction which in turn needs to breath which can give off dangerous fumes. You can only usually safely discharge to 50% without damaging the battery which means if you have a 20 ah battery, its really a 10 ah battery. Each time you deep discharge it the cells themselves get damaged.
We know of nicad and they are good enough for 50% discharge as well. Life cycles are about the same 200-500 (full discharge/recharge) they are heavy as well. They do well in all kinds of weather as like the lead acid. They too, have a strong current to be able to start motors.
Next we have lithium batteries. As we know from years past about the dangers with straight lithium batteries they can explode. They are lighter than the lead, gel and nicad batteries. They have a long duration of usage as well. You can safely, and protect the battery life by charging to 90% and deplete to 20 percent. Thus, giving you at least 30% more time between charges. This type and the lifepo4 batteries generally are not strong enough to start a car engine. They can store their current state of charge much longer, up to a year. The dangers are high heat and they do not like the cold weather. Infact, anything below 32 degrees can forever damage the battery. The life cycle for these generally are from 500-800 charge cycles.
The last type of battery we will discuss here is lithium but called lifepo4. They use a lot less lithium in their chemistry and have proven to be a safe alternative for energy storage and use. They are lighter than lead acid but the same size. They Have all the benefits of lithium in fact, but manage to do things longer and better. They are safer than lithium batteries with no runaway power and can tolerate heat a bit better. These too are limited to cold weather usage however with the same debilitating 32 degree min temperature. They have 2000-5000+ life cycle when they reach 80% life. Which means about 10 years and they still have 80% storage capacity. Makes your investment longer for return a wee bit sweeter.
Most of us will be looking for 12 volt batteries. A bit cheaper than 24v-48v batteries and many of the components we may already have or available are very easy to find using 12 v.
Sometimes, as you will see in the next post of what we chose and why you will desire to have a 24v battery or more Ah (amp Hours) and yet you already bought a certain battery. Well, we can combine 2 batteries of the same type and same voltage and ah together Usually the maker of the battery would really like you to have 2 of the same exact batteries, which realistically is also promoted to have success at keeping your batteries good.
If you have a 12v battery but now you want it to run a 24v inverter then your not lost -- just pick up a second battery and wire it up serially. Below, you can see a diagram serially wiring to batteries together. This keeps the same ah but doubles your voltage. If you need more or desire for a longer lasting battery (more AH) than you can wire them up parallel with the same second battery as illustrated in the last included diagram.
If you can help, we would truly appreciate and need it -- Thank you https://gofund.me/5b4a16c6 Any little bit helps and we truly are grateful.
The next post we will discuss what we chose for our science project, why and why we added to it.
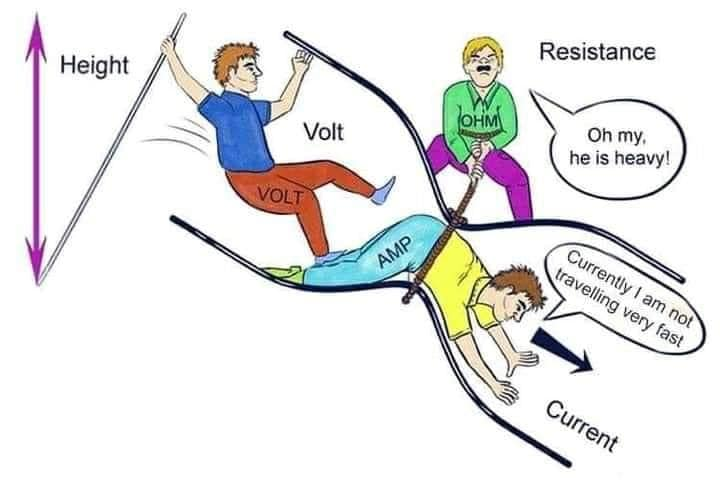
Thought this was way too cute not to share
What Container?
The first step in planning is to decide how you want to install the components. We chose for portability and ease of installation with a lot of real estate inside to work with. We wi... View MoreWhat Container?
The first step in planning is to decide how you want to install the components. We chose for portability and ease of installation with a lot of real estate inside to work with. We will discuss this decision of ours later. However, there are many different choices from a flat board to a ammo can. What you want to accomplish and utilize this for should be well thought out already. If its to simply show a class and demonstrate how a solar generator functions and how to wire up each component then a simple flat board will do. By assembling on a board you will have ample room, however big you chose it to be and then you can simply have a quick connect to the battery and solar panel(s) when you want to demonstrate it. This would also be good for a stationary area you wish to power such as a small barn or shed and have it hanging off the wall. If its portability however, this may not be a wise decision.
Other decisions would be a battery box or even a ammo can. Remember, the ammo can is quite small but could house some led lights, usb chargers and cigarette sockets to power some sources. However, remember these components produce heat and heat is a enemy to some degree to electrical and battery components so you would need to consider how you will vent the to help the heat escape.
Ammo Can Suggestion: https://amzn.to/3MraRyB
Battery Box Suggestion: https://amzn.to/3Lf90Na
Of course, these are for smaller batteries and smaller ideal purposes.
Our next project the boys and I decided on will be a little larger and to make it easier to handle and maneuver we decided to get a little larger crate with wheels on it. It's pretty nifty, you can see while we are still getting a few things for the project it sure folds down quite small.
Foldable Shopping cart Suggestion: https://amzn.to/3LbVZ76
These containers will make a prettier project but a lot more work will be involved like drilling holes and making sure there is air circulation.
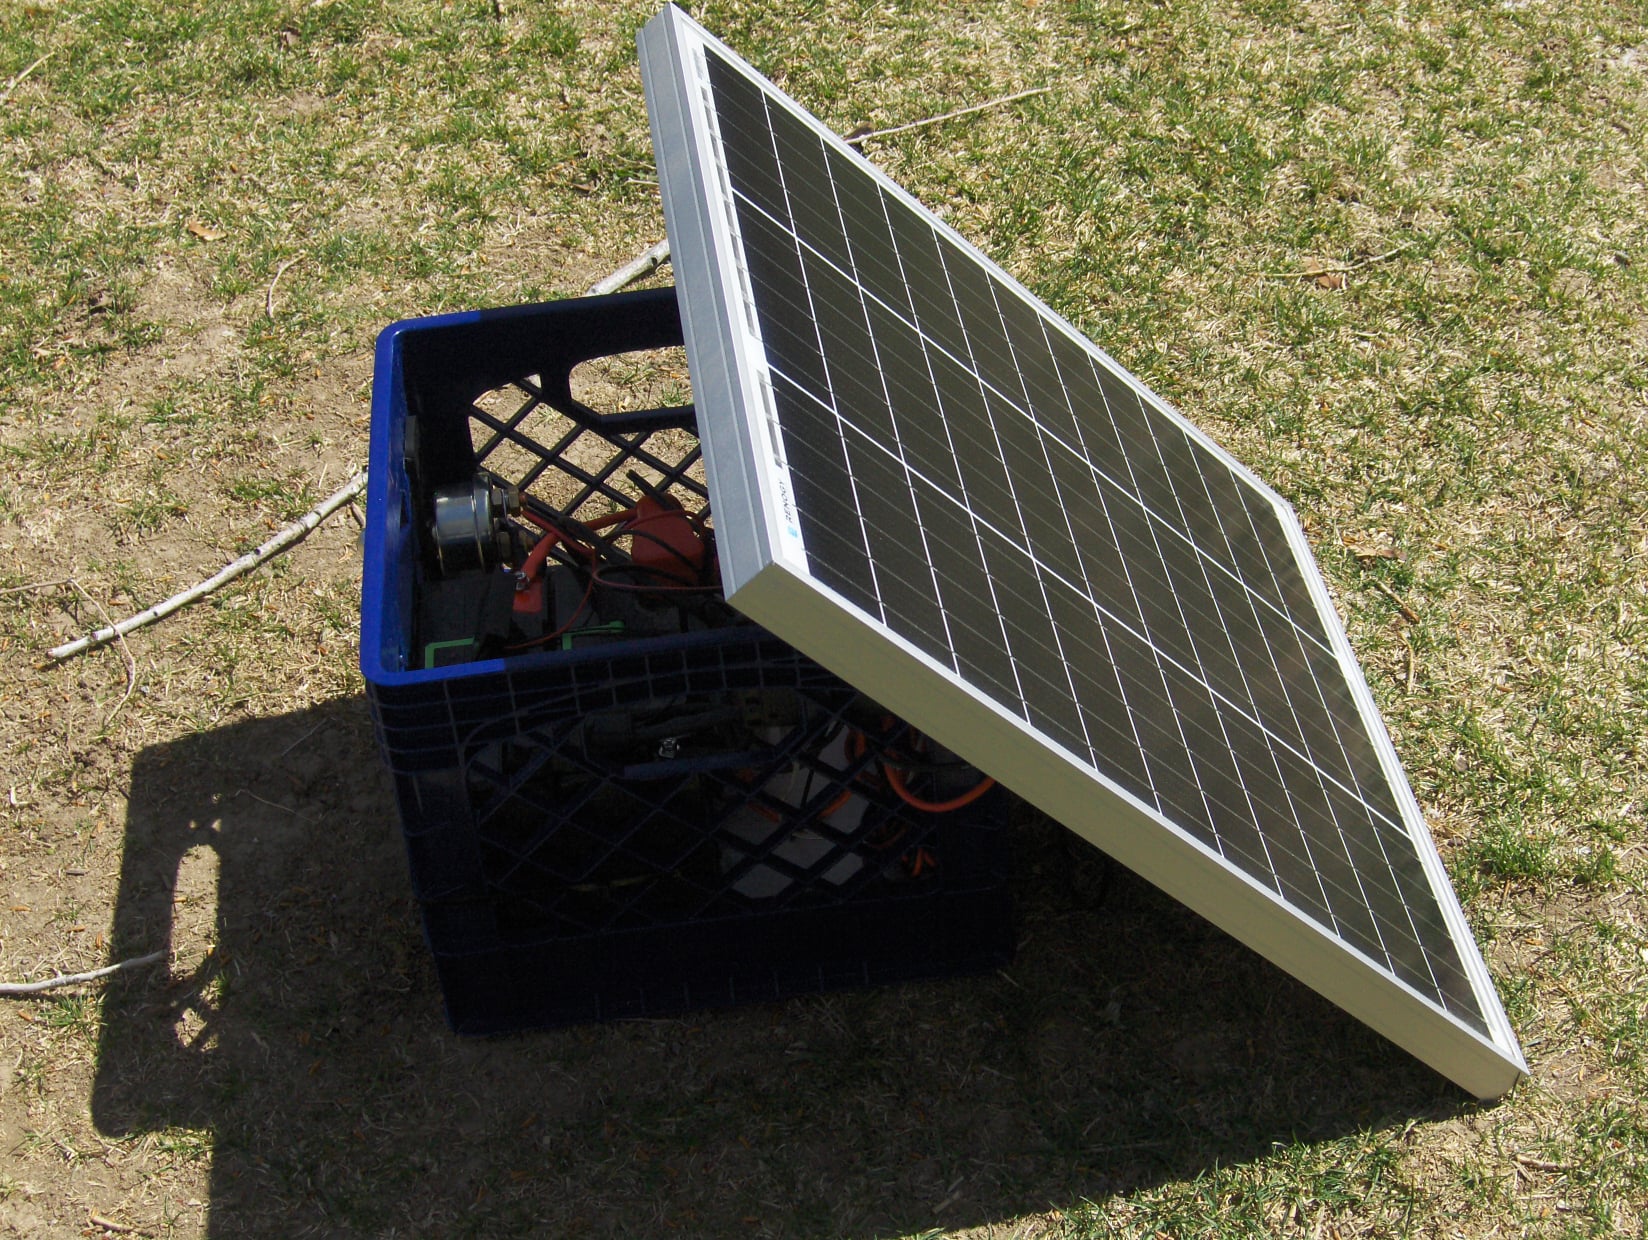
Thus, this brings us to our choice the simple milk crate. Airy and multiple ways to attach the components as well as roomy on the inside. Our first project was to see if we can do it as well as experiment with different components. Later Steps we will discuss some of these changes that we made and errors too so you won't have to be bothered with them. The other thing is budget, how much do you want to spend. Some milk crates you would think are made of gold when it comes with cost, but your in luck if you have a Target or Home Depot in your area, which we don't and that is how we learned they don't ship this item you have to go into the store and buy it. I think Target has a milk crate for a little over 7 dollars and home depot is close to that.
Suggestion if your target or home depot does not have it or your like us and have none near us.
https://amzn.to/3EUBYjf
Now, you wont be able to fit a 100 ah battery or lead acid of any size in these choices but it will hold 2 28 ah batteries or a 50 ah battery nicely. Also, these are very portable, easy to carry even for the kids with their built in handles.
The next step we will be learning about different chemistries used for batteries and why we chose the ones we did.
If you can help, we would truly appreciate and need it -- Thank you https://gofund.me/5b4a16c6 Any little bit helps and we truly are grateful.
Until then, have a great day.
these posts may contain affiliate links, and yes, we will earn a small commission but no cost to you. This helps us to purchase further things for testing so you don't have to.
Amazon.com: Sheffield 12633 Field Box, Pistol, Rifle, or Shotgun Ammo Storage Box, Tamper-Proof Locking Ammo Can, Water Resistant, Made in The U.S.A, Stackable, Teal : Sports & Outdoors
Amazon.com: Sheffield 12633 Field Box, Pistol, Rifle, or Shotgun Ammo Storage Box, Tamper-Proof Locking Ammo Can, Water Resistant, Made in The U.S.A, Stackable, Teal : Sports & Outdoors
Planning -- Phase 1
The finished product looks so simple, but there is a lot that goes into planning for this project. This was probably one of the most important steps that eventually made this pro... View MorePlanning -- Phase 1
The finished product looks so simple, but there is a lot that goes into planning for this project. This was probably one of the most important steps that eventually made this project super budget cost effective, after some trials and errors of purchasing parts and changing our mind. The final project actually cost us less than what a commercial project would have cost with more power, better battery chemistry and flexibility. The whole project will cost a little over 200 dollars.
While your planning, if this is going to be done with a child and they have yet learned about simple electrical circuits and energy, may I suggest a few things I bout my boys while I was planning it out so they can easily understand what we are doing from step to step.
Children ages 5 on up
Energy: Physical Science for Kids Paperback – Picture Book, March 1, 2018
https://amzn.to/3kbY3zT
Middle School aged Children
Electricity & Magnetism, Grades 5 - 8 (Connecting Students to Science)
https://amzn.to/38fYyWW
Children ages 8 and up
Elenco Snap Circuits Jr. SC-100 Electronics Exploration Kit, Over 100 Projects, Full Color Project Manual, 30 + Snap Circuits Parts, STEM Educational Toy for Kids 8 + , Black
https://amzn.to/3k1vS6Z
The Planning Stage will be broke up into easy segments, soon, when we have all the supplies we need, and assurred we have all the tools needed for the project, we will be ready to start and will only take a few hours to assemble.
Probably, the 2 most expensive items in this project will be a battery and the solar panel. So, if saving, up and working on this project slowly, but surely, just something to keep in mind.
Some of the things we will be looking at.
Reason
Why are we creating it and what function do we want it to perform.
A container. What will you want your finished product to be housed in. The shell of the project is quite important, because it pretty well dictates the amount of room we will have for our components as well as how big and what we will include without cluttering it. A few thoughts here, almost all electrical components will produce some heat, some more than others. and, of course we are dealing with electricity so we don't need to have a bunch of wires crammed in to a small place crossing positive and negative electrical charges.
Battery
Here we will learn briefly on battery chemistry, how to know how much energy the battery can store and of course the dimensions of the battery itself. Will it fit safely inside our chosen container.
Solar Charge Controller
We want free energy, here we will learn what type PWN or MPPT, how big of a charger do we need. If under powered we can wait days to charge, if over powered we cannot use it safely. We will also learn how to wire one up as well as set up simple settings.
Solar Panel
Once we figured out what we will store the energy captured by the solar panel, and how we will convert the energy to charge the battery then we will need to figure how to capture the Sun. We will learn how to know what size solar panel will work for us as well as what type, We have stationary and likewise travel cased panels we can choose from.
Now that we have all this fabulous free power stored, how the heck are we going to use it. Here we will learn of many different choices you have and how to wire them up. From USb chargers to cigarette lighter sockets to inverters so we can plug in small wattage devices.
Okay, we have the items planned for our project, but lets not forget having the proper tools available will make the job a lot easier and of course other expendables such as wire, connectors, fuse box and fuses ect...
Once all this is checked off, the rest will be easy peazy and put together like a simple jig saw puzzles, safely and functional for a very long time.
Ready to get started?
these posts may contain affiliate links, and yes, we will earn a small commission but no cost to you. This helps us to purchase further things for testing so you don't have to.
If you can help, we would truly appreciate and need it -- Thank you https://gofund.me/5b4a16c6 Any little bit helps and we truly are grateful.
Energy: Physical Science for Kids: Diehn, Andi, Li, Hui: 9781619306417: Amazon.com: Books
Energy: Physical Science for Kids [Diehn, Andi, Li, Hui] on Amazon.com. *FREE* shipping on qualifying offers. Energy: Physical Science for Kids
Wishing everyone a Wonderful visit and I hope you either can learn something from these tutorials or can add something for all of to learn from. The first, as the title of the page implies is a simpl... View MoreWishing everyone a Wonderful visit and I hope you either can learn something from these tutorials or can add something for all of to learn from. The first, as the title of the page implies is a simple, cost friendly, but well learning on how to build your very own functional solar generator.
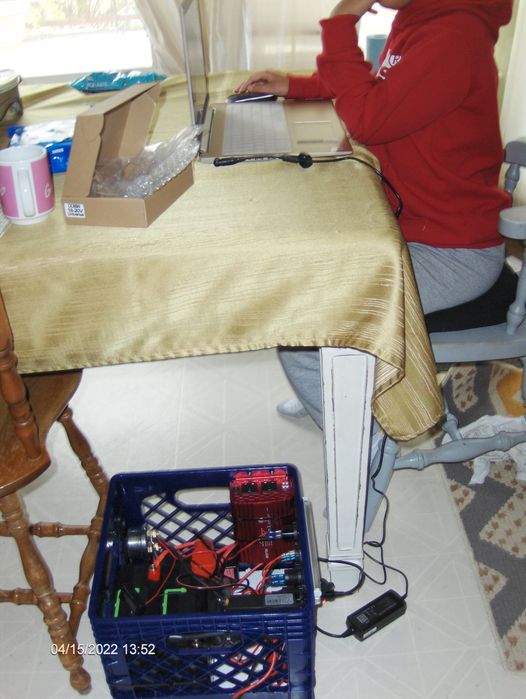
Here you can see it in action charging my Son's laptop in the included photo.
The first few post will help during the planning stages and then we will get to building it. Other projects will be building a larger, more functional unit and then whatever else comes to be.
So, lets start and Have Fun!
Disclaimer:
Any links included help us to save and eventually afford better equipment to test and create more projects. These are mainly affiliate links that I created. Not much, but eventually, if enough people do chose to use the link every little bit helps. So, these posts may contain affiliate links, and yes, we will earn a small commission but no cost to you. This helps us to purchase further things for testing so you don't have to.
page=2&callback_module_id=groups&callback_item_id=12429&year=&month=
Load More